WMS


The power of a well-organized team: getting started with authorizations
30 Nov 2023
3 min read
Have you ever watched the Tour de France? Then you know that each cyclist has a specific role in a team. For example, each team has climbers, sprinters, domestiques, and time trialists. Each has a specialty. And together they form a perfectly balanced team. As a logistics service provider, you face a similar situation. You have many employees, spread across several departments, each with their own specialty. They all need to work together like a well-oiled machine to achieve the company goals. Here are some ways to make sure your employees can focus on what they do best.
One team, one job
Within 3PL Dynamics, every department works in an integrated system. This means that everyone must work well together and understand their role, just like in a cycling team. Only then can you be successful as a team. However, it is still possible for an employee to perform work that is not within his or her scope. To prevent this, 3PL Dynamics provides the ability to determine who is allowed to “take the wheel”. You do this by assigning roles and responsibilities within the status template. And the great thing is, you can do it yourself. Below we will explain what options you have and how to set them up.
Assigning roles and responsibilities is possible for all document types. Some examples are: Inbound, Outbound, Customer Cards, Customer Items, Locations and Movements.
Tip: Use a shortcut by typing ‘SSJ’ in the search bar.
Restrict who can change document status
Maybe you know this situation. A colleague accidentally moves a document’s status to the next state. The team is frustrated, the process is disrupted, and the customer receives inaccurate information. The solution is at hand: authorization. With authorizations, you can control which users and/or profiles (roles) can change the status of a document. You can set this up by following the steps below. Other users can still make changes to the document.
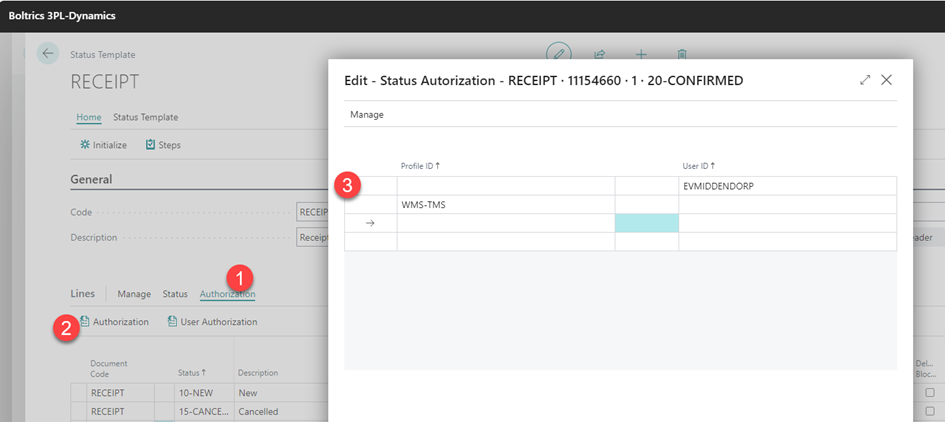
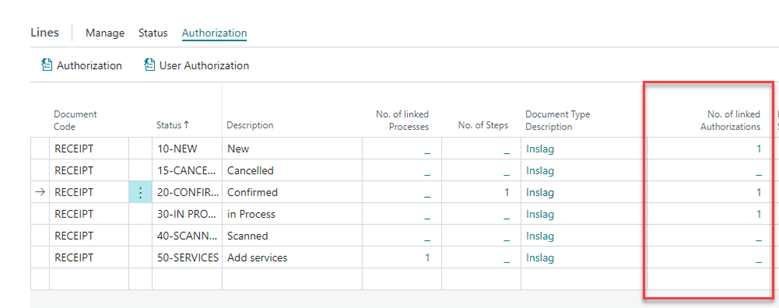
You can customize the authorization view to suit your personal preferences. For example, by adding the ‘No. of linked authorizations’. This functionality offers insight into which status authorizations are set.
Restrict who can modify documents
You now know how to set permissions for the users and/or profiles (roles) that are allowed to forward the status of a document. However, all other users can still make changes to the document. The last thing you want is someone making changes they shouldn’t be making. There is a solution to this, called User Autorizations. Prevent frustration in the team and set these permissions as well.
Under User Autorizations, you can specify whether a user can make changes to the document. This is done with the ‘Editable Yes/No’ setting. Please note that this setting does not determine whether a user can change the status of the document. Any user not included in this list can make changes to the document.

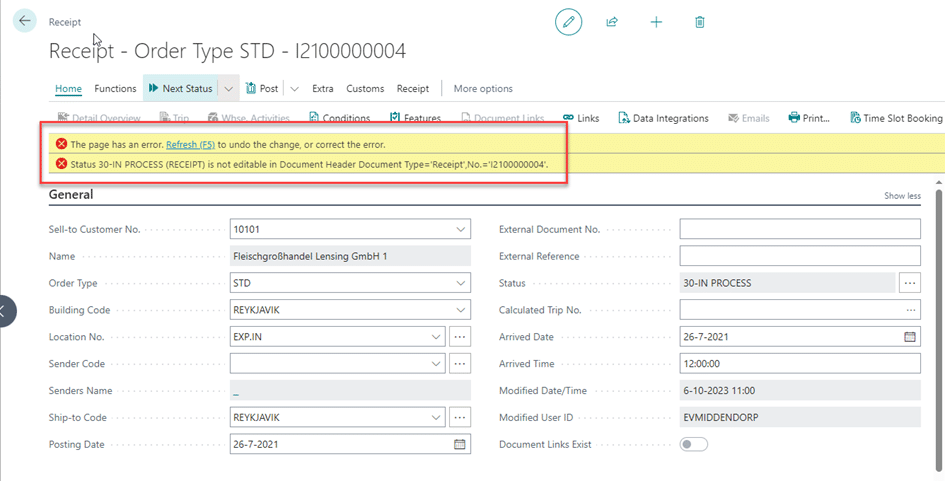
If an employee attempts to make a change without the required authorization, the following message is displayed:
Analyze your data in 5 seconds
Now that you have all the authorizations set up, you have taken a big step towards streamlining your workflow. But did you know that there is another way to streamline your workflow? For example, with the Analysis button, you can see in just 5 seconds which orders you can expect in the coming days. Read more about this in our blog Streamline your work process – the low-hanging fruit from 3PL Dynamics to look out for.